The load time of websites is one of the most important factors affecting its usability; most Internet users will just skip a site altogether if it fails to load within a couple of seconds. Below you will find the summary of the “Speed Up Your Site” series. Those are simple yet effective ways to make sure that your website is running fast. You can click on each point to read the article with comments from the readers.
Now if you are thinking that the speed of your websites DOES NOT affect user experience you got another thing coming!
If the average person can hardly wait 30 seconds for the microwave to finish heating up their food what makes you think they got time to wait for your website to load?
Especially if your competitor has their food fresh. HOT and ready to eat. You do not want to give your reader a reason to leave your site and if it takes more then 10 seconds for you to deliver what they’re looking for it’s more likely they have clicked the back button.
Not only does it affect your readers experience on your site, Mr. Google also takes into account the speed of your website when ranking your blog. So if you are going after Search Engine traffic you definitely want to pay attention.
First things First:
- Optimize Images: always use the “Save for the web” feature included on image editing software. Images represent the heavier load on virtually any website so make sure you are optimizing them. Alternatively you can also turn to an online image optimizer.
- Image Formats: apart from optimizing images it is important that you choose the right format. JPEG format is suitable for photographs or true-color images. The GIF format should be used with flat-color images like logos or buttons. PNG works very similar to GIF but it supports more colors.
- Optimize Your CSS: most websites are designed with CSS nowadays. Make sure to aggregate and clean your CSS. CleanCSS is an online tool that will merge similar selectors, remove useless properties and remove the whitespace from your code.
- Use a Slash on Your Links: when a user opens a link on the form “http://www.domain.com/about” the server will need to figure what kind of file or page is contained on that address. If you include a slash (/) at the end of the link the server will already know that this is a directory page, reducing the load time of the site.
- Use the Height and Width Tags: many people forget to add the Height and Width tags on image codes. Those tags will make sure that the browser knows the size of the image before loading it. The result is that it will reserve a spot for the images while loading the rest of the page, speeding up the whole process.
- Reduce the HTTP Requests: when opening a web page every object (images, scripts and the line) will require a round trip to the server. This latency can add several seconds to the load time of your site. Make sure to reduce the number of objects and to combine CSS files and scripts together.
Ways on How to Configure your Website Speed
Check the Speed of Your Website
The first thing you have to do is check exactly how fast your website is loading. There is a great website out there that was brought to my attention by a good friend of mine Arthur Tubman.The website is http://loads.in/
When you go there you will see that it’s very self explanatory and all you have to do is enter your URL and hit “Start.” The site will do it’s magic and spit out your loading time in seconds.
After you run the first test you can then choose to check loading time from a different location in the world and from any other web browser if you want more detailed information.
You will also see that it does remember the history of your website should you come back on a later date and run the test again.
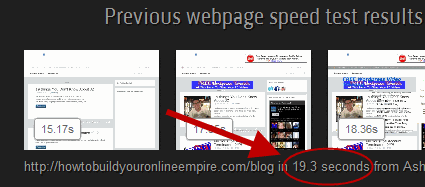
Here are the results before I tweaked my site
Yes
that says 19.3 seconds! Can you believe it! Who is going to stick
around for nearly 20 seconds for my site to load? I know I’m not.
But here is the good part
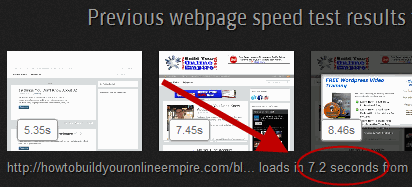
Now that is more like it! I can handle 7.2 seconds. That is manageable.
If you are thinking that your blog is brand new and speed doesn’t affect you trust me you are WAY WRONG!
I did this same tweak to 3 BRAND new small niche blogs and they each went from a 9 second load time to under 3 seconds.
So exactly how did I cut down my loading time by over 13 seconds?Use a Content Delivery Network (aka CDN):
A content deliery who?? Yes trust me i thought the same thing the first time I heard it.I still have a bit of trouble understanding exactly what it is but to my understanding a content delivery network takes the data from your website, makes a copy of it and places it on multiple servers around the world.
By doing that it is able to deliver the content as quickly as possible to people all around the world.
So think of it as a cell phone tower. The closer you are to a cell phone tower the more reception you have, the further you are the less reception you have. So the closer your reader is to the server providing your website information the quickeryour website loads.
Without a CDN ALL your website data is being stored in ONE location making it difficult to deliver the information in a timely manner if different computers are requesting the information on your website from multiple places around the world.
Wow that was a mouthful but I hope you got the gist of what a CDN does.
How Much Does A CDN cost?
I personally use Amazon S3 storage to store my file and Amazon Cloudfront as the CDN to deliver the data. I am on my first month using BOTH service but when I only had s3 (which stores over 40 training videos for me) I have yet to break a $1 invoice bill with them. Literally! They are THAT inexpensive. My last bill was .14 cents!It seems as if my Cloudfront bill is going to be the same since the First 10 TB/month runs at $0.150/GB. Again Extremely inexpensive.
Once you have your s3 and Cloudfront accounts set up it’s time to get this puppy going on your blog.
How To Configure Your CDN On Your Blog
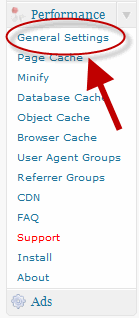
One of the reason’s I LOVE wordpress is because everything is always so easy to set up and setting up your CDN is no exception.The first thing you will have to do is install the “W3 Total Cache” Plugin and activate it. From there just follow the screen shots below.
1.Find the Total Cache Setting Tab on the left
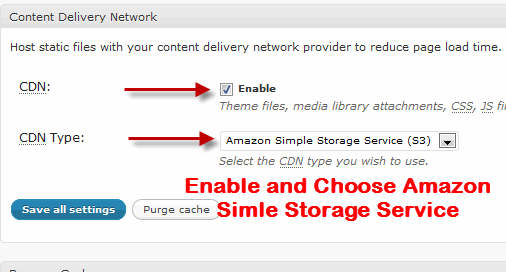
2. Scroll Down and “Enable” the CDN and choose Amazon Simple Storage Service
3. Find The Content Delivery Tab at the Top Next To Referrer Group

4.
Scroll down and find the “Configuration” Tab and insert your Acess Key
and Secret Key. Keep reading for instructions on how to get an access
and secret key.
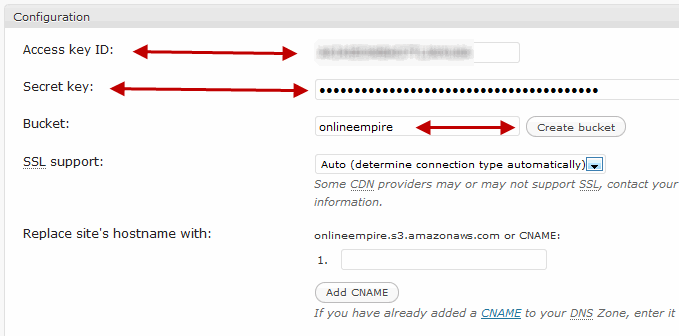
4a. Find the email labeled “Welcome to Amazon Web Services” that you received when signing up and login. Find the “Security Credentials” and Click on “Access Credentials”

4b. Create a new “Access Key”

Don’t forget to name and “Create Bucket” By doing this you are creating a folder where the files to your blog will be hosted within your S3 account. This will come in handy next.
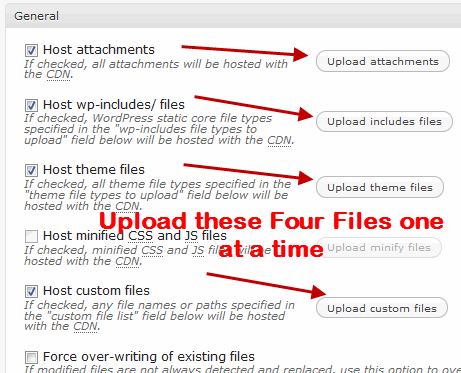
6. Once you finish linking your Total Cache with you S3 Account you have to upload your files. You will see a notification pop up at the top asking you to do this. Or you can just scroll up in the CDN area and hit the 4 buttons one by one.
Just
a note. If you have other “inactive” theme’s installed on your blog you
may want to delete these so they DO NOT get uploaded when you hit
“Upload Theme Files”
7.
Once you finish uploading your files to your S3 account it’s time to
link it to your Cloudfront account. On the same page where you created
your Access Key, look at the top of the page a click “Sign In To AWS
Management Console”

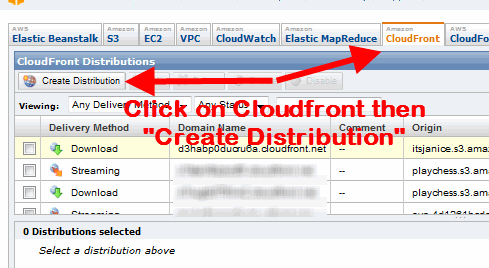
8. Once logged in Click up top Where it says “Cloudfront” and then click on “Create Distribution”
9.
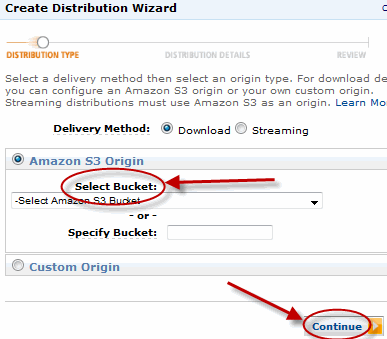
From there a pop up will show up where you can select the bucket to
configure with Cloudfront. You can select a delivery method of
“Download” or “Streaming.” From what I read and understand if your
bucket contans only videos then streaming is the way to go, for a
regular content blog “download” should work fine.
But I do recommend you do your own research and see what would work best for your blog.
10.
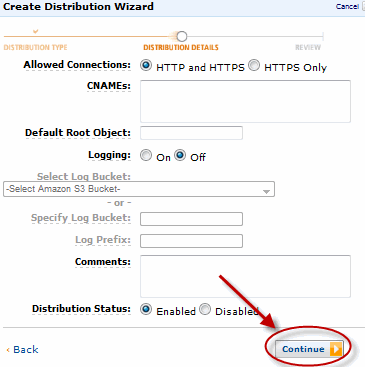
In the next pop up just click continue. This deals with CNames which
from what I read allows you to customize the URL of your files.
11.
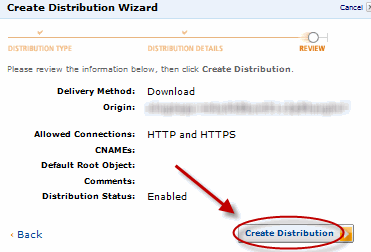
And FINALLY in the last pop up hit the “Create Distribution” button and
let cloudfront do it’s magic. Depending on the size of your blog this
may take a few minutes.
12.
There is one LAST step to do and that is to actually “Deploy” the
changes to the W3 Total Cache Plugin. So go back to the Total Caches
settings and hit “Deploy” in the notification up top.

And finally that is it! You can now go back to http://loads.in and recheck your loading speed.
Again
DO NOT ASSUME your blog is fast just because it’s brand new! I did this
to 3 small niche blogs and cut my loading speed from 9 seconds to under
3!!
I hope this article helps
you out and you get it working on your blog. If you have some issues
setting this up feel free to contact me through email, the comments
below.
To Your Lightning Speed Blog,
Categories:
Blogger Tips




0 comments:
Post a Comment